- Sat 19 December 2020
- Raspberry Pi
- #raspberrypi, #vban, #audio, #networking, #music, #home-automation
I'm something of an audiophile.
Not completely, mind you, just partly.
Why partly? Well, I love audio! Anymore, I don't really watch television, or movies; but I listen to audiobooks, podcasts, music, and more all the time! I like to listen everywhere. Home, work, while driving. EVERYWHERE. And I like to have my audio follow me around all the time. In other words, I like having the same music in my study as what's in my living room, kitchen, bathroom, bedroom... EVERYWHERE.
I'd say that I enjoy quality HiFi audio, but I'm not the pickiest out there. My kitchen, for example has some pretty crude audio since I bought a pretty cheap stereo reciever and just sorta threw it together. Still, I enjoy it. It gives me audio when I'm cooking, cleaning, or just hanging out; and for me, that's the most important part.
When I bought my home, I decided that I was going to install an "Audio Bus" to allow bi-directional audio transportation. I've since started on the project, but I've run out of speaker cable, and considering the crazy holiday spending, I've put on the brakes for the moment on my "personal" spending. That means that I've only been able to hard-wire a connection between the kitchen and my study. But I really want more.
My Solution
Enter VB Audio Network.
VBAN is a UDP-based network audio streaming protocol that was developed by the same individual who created the Banana audio mixer which I've come to love for my desktop audio mixing desires. It's essentially a networked audio system, allowing streaming audio transmission and reception, and it's officially supported on Windows, Android, and iOS; and community-supported on Linux!
That's right, it's available on Linux, and it's fully open-source as vban where it's accessible as a command-line-based reciever or transmitter.
My Process
So... Late last night, after a long day of work, I decided I wasn't done programming, so I started in on this project. I took an old Raspberry Pi that I'd already mounted in my vintage Zenith cabinet stereo (that's a story for another day, and I'll have to tell you about it!) and I began preparing it. Somehow, I'd ruined the SD card, so I chucked the original SD and flashed a new one with the latest build of RaspberryOS. After I had the card flashed, I dropped an empty file titled 'ssh' in the /boot directory so that it would enable SSH on initial boot.
Now, with SSH set up, and my new SD card plugged into the Pi, I powered it up and connected remotely; updating the system with sudo apt-get update and sudo apt-get upgrade -y I had a fresh install ready for my experimentation!
Now, for the benefit of new tinkerers interested in VBAN setup on a Pi (and a way to jog my own terrible memory sometime in the future), I'll try to illustrate the remaining steps as best I can remember. I had to play with some trial and error, so I'm reordering some steps to make it more clear and straight-forward, but I'll comment on some of the "hardships" I had after we get through all of the steps. My process was centered around the installation instructions on the vban project README, but I did deviate a little to get it working.
After preparing my "fresh install," I went ahead and installed the Raspberry Pi and Alsa headers so that they'd show up for the installation.
$> sudo apt-get install raspberrypi-kernel-headers
$> sudo apt-get install libasound-dev
With my new headers installed, I was ready to clone the git repo and build it. I guess that at this point, I should mention that I'd previously installed git, but I suppose you might have been able to infer that on your own. Anyway, I cloned the repo to my home folder:
$> git clone https://github.com/quiniouben/vban.git
Now, I moved myself into that new directory with: cd vban
Before I could build the vban system by following the instructions on the GitHub repo, I needed to install the autoconf tools so that the autoconfiguration scripts would function.
$> sudo apt-get install autotools-dev
$> sudo apt-get install autoconf
I then went ahead and followed the installation instructions from the vban project README, substituting a few extra arguments to satisfy the system requirements (Alsa only, no Pulse/Jack).
$> ./autogen.sh
$> ./configure --enable-alsa --disable-pulseaudio --disable-jack      # Only using Alsa
$> make
$> make install
After I got all of that working, I was able to set up my Windows desktop running Banana Mixer to stream to my Raspberry Pi using VBAN. I configured VBAN on my desktop to stream as such:
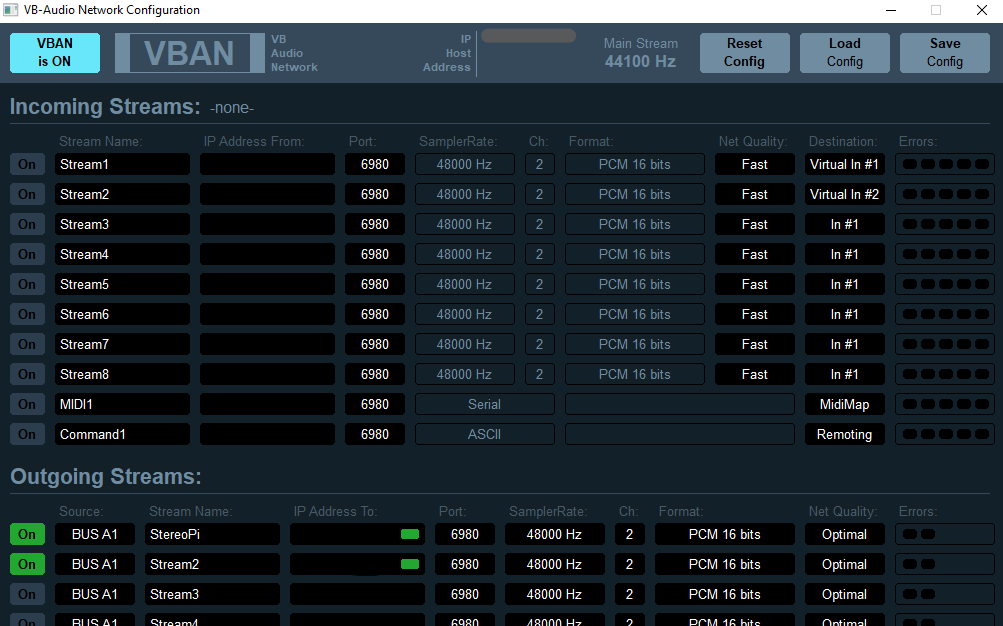
Then, I could simply issue the following command in my Raspberry Pi to start listening!
$> vban_receptor -i <my-desktop-ip> -p 6980 -s StereoPi -d front -q 0
This meant that I'd listen for a stream of name "StereoPi" from my desktop with it's specific IP address on port 6980. I'd then stream that audio to the "front" output in my Alsa config, and (since this is a hard-wired Ethernet connection) I set the highest quality to reduce delay.
Viola! I've now begun sharing audio between my desktop and the Raspberry Pi!
Another Dilemma
Ah, but we weren't done yet! See, that command is blocking, meaning that if I close my SSH connection, say good bye to audio! Drat!
I decided that to fix this, I'd write a little systemd service, and keep it disabled, so that I could start and stop it easily enough (so if I want to use other audio services, they won't clash too terribly).
So I wrote this:
# vbanstereorx.service
# VBAN Receptor Stereo Service

[Unit]
Description= VBAN Stereo Receptor

[Service]
Type=simple
ExecStart=/usr/local/bin/vban_receptor  -i <my-desktop-ip> -p 6980 -s StereoPi -d front -q 0

[Install]
WantedBy=multi-user.target
Then simply "installed" it with the following command:
$> cp vbanstereorx.service /etc/systemd/system/vbanstereorx.service
Now, I can just start or stop the reciever by issuing sudo systemctl start vbanstereorx or sudo systemctl stop vbanstereeorx, respectively!
The Other Challenges
I'm afraid it all wasn't easy-peasy, and setup smooth; there were still a few hiccups.
Right now, the biggest thing is that I believe Alsa is on its way out for the Raspberry Pi, so I have a feeling that I'm gonna need to reform this at some point, but perhaps that's just for the Pi4 for the time being? I'm not really sure... Anyone who might know, hit me up.
The other issue that I ran into during installation was the use of autoconfig scripts and RPi/Alsa headers. Since they weren't explicitly called out as installation requisites, I bumped into them, and had to take to Googling my way out of a corner. Wasn't bad, just slowed me down.
What's next?
I'll have to save that for another post; another day. Just keep your eyes peeled!